
Really Needy HUD
for your Second Life
Skin Effects setup
This page describes how to setup Skin Effects for the Really Needy HUD.
The Really Needy HUD will activate the addition of layers automatically to your avatar using RLV if certain conditions are met as described here. (Note: your viewer must support RLVa and your avatar body/head must be BOM-ready).

SKIN EFFECTS PACK Installation Instructions
Follow these steps to setup the following skin effects to work with your Really Needy HUD:
-
Waterdrops - Steps 3 to 7
-
Dirty Face & Body - Steps 8 to 9
-
Tired Face - Steps 10 to 11
-
Chapped Lips - Steps 12 to 13
If you bought the Skin Effects Pack from Marketplace, you can jump to the Express Setup Instructions below.
-
Unpack the box you received from your purchase.
-
Open your Inventory window (Recent tab) to find the folders you unpacked. There should be 5 folders:
-
Open a new (second) Inventory window. Make a #Izzie’s folder within the #RLV folder in the root level of your inventory. If you don’t already have a #RLV folder, create one.
-
Create a subfolder in the #Izzie’s folder and name it “Wet”.
-
(Optional) Copy the “Underwater” source folder and contents to the “Wet” folder you created.
Explanation: Contents of "Underwater" subfolder will be auto-attached (added) to your avatar when underwater, and auto-detached when not underwater.
-
Create a subfolder in the “Wet” folder you created, and name it “Waterdrops”.
-
Copy the tattoo layer “Izzie's - Face & Body Waterdrops” from the source folder into the “Waterdrops” subfolder you created.
(Choose the version appropriate for your skintone)
-
(Optional) Copy the “Really dripping wet” object from the source folder into the “Waterdrops” subfolder you created.
If you have followed steps 1 to 8, it should look something like this:
Explanation: Contents of "Waterdrops" subfolder will be auto-attached (added) when your avatar enters and then exits SL water or compatible scripted water. Attached items will self-detach after a short period of time to simulate skin drying.
-
Create a subfolder in the #Izzie’s folder and name it “Dirt”.
-
Copy the tattoo layer “Izzie's - Face & Body Dirt” from the source folder into the “Dirt” subfolder you created.
(Choose the version appropriate for your skintone)
-
Create a subfolder in the #Izzie’s folder and name it “Tired”. Within it, make two more subfolders called “Tired Eyes” and “Tired Face”.
-
Copy the tattoo layers "Izzie's - Tired Eyes" and "Izzie's - Tired Face combined" from the source folder into the subfolders within “Tired”. You can customise your own mix by choosing multiple layers for Tired Face instead of using the combined layer. Also, choose the version appropriate for your skintone.
If you have followed steps 9 to 12, it should look something like the following:
-
Create a subfolder in the #Izzie’s folder and name it “Chapped Lips”.
-
Copy the "Chapped Lips" tattoo layer from the source folder into the "Chapped Lips" folder. Choose the appropriate version for your skintone. It should look something like this:


I am going to refer to these folders as the source folders
This is a snapshot of my inventory window. I use Firestorm. It may look a little different if you are using a different viewer.
Explanation: When your avatar's Thirst meter drops to 40% or below, the contents of the Cracked Lips folder will be auto-attached (added). When Thirst meter is higher than 40%, the contents of the folder will be auto-detached.
Congratulations, you are done!
If you have finished the above steps to install the Skin Effects Pack, it will look like the pic below, if you collapse the subfolders.

EXPRESS SETUP INSTRUCTIONS (FOR MARKETPLACE DELIVERY)
-
Copy and paste the #Izzie's folder in your SKIN EFFECTS PACK delivery folder into the #RLV folder in your Inventory.
-
If you already have a #Izzie's folder in your #RLV folder, copy and paste the contents of the #Izzie's folder from the SKIN EFFECTS PACK into the #Izzie's folder under #RLV.
-
Check that you have a folder structure like the picture on the left.
-
-
Choose the tattoo layers you want to use by deleting the extra layers in the subfolders on the left. You should still have a copy in your delivery folder.
Installation instructions for other system layers made by Izzie's
The Really Needy HUD v2.4 and related add-ons can also work with other tattoo layers created by Izzie's. However, you need to follow the instructions below to put them in the correct folder structure. Your viewer must also support RLVa. Make sure that your avatar is also BOM-ready.
Click any of the following links to jump directly to the section below.
Hangover Face
-
Make a #Izzie’s folder within the #RLV folder in the root level of your inventory. If you don’t already have a #RLV folder, create one.
If you already have a #Izzie's folder, go to step 2.
-
Create a subfolder in the #Izzie’s folder and name it “Hangover”.
- Browse through the different tattoo layers in your "Izzie's - Hangover Face Tattoos" folder in your inventory. (Bought separately)
- Copy the desired tattoo layers into "Hangover" subfolder under #Izzie's.
For example, I would like my avatar to have light eyebags, smudged mascara and smeared lipstick, so it looks like this:

Explanation: Contents of "Hangover" subfolder will be auto-attached (added) when your avatar reaches Blood Alcohol Content (BAC) level of 0.14 and above, and auto-detach when your avatar is sober.
Sick Face
-
Make a #Izzie’s folder within the #RLV folder in the root level of your inventory. If you don’t already have a #RLV folder, create one.
If you already have a #Izzie's folder, go to step 2.
-
Create a subfolder in the #Izzie’s folder and name it “Sick”.
-
Create subfolders in "Sick" called "Cold" and "Flu".
-
Browse through the different tattoo layers in your "Izzie's - I've Got The Flu" folder in your inventory. (Bought separately)
- Copy the desired tattoo layers into "Cold" and "Flu", depending on how sick you want your avatar to look.
For example, it might look like this after I set it up for my avatar:

Explanation: Contents of "Cold" and "Flu" subfolder will be auto-attached (added) when your avatar gets infected with the Cold disease and Flu disease respectively. When your avatar recovers, the contents of the subfolder will be auto-detached.
Breast Veins
-
Make a #Izzie’s folder within the #RLV folder in the root level of your inventory. If you don’t already have a #RLV folder, create one.
If you already have a #Izzie's folder, go to step 2.
-
Create a subfolder in the #Izzie’s folder and name it “Breasts”.
-
Create subfolders in "Breasts" called "Baseline", "Cycle" and "Pregnant".
-
Browse through the different tattoo layers in your "Izzie's - Breast Veins & Stretch Marks" folder in your inventory. (Bought separately)
- Copy the desired tattoo layers into "Cycle" and "Pregnant".
- If you would like your avatar to have slightly larger breasts due to hormonal changes in the female cycle, or due to pregnancy, make copies of your avatar's shape with different breast sizes.
- Put the normal shape into "Baseline".
- Put the shape with slightly larger breasts into "Cycle".
- Put the shape with enlarged breasts into "Pregnant".
For example, my avatar's normal breast size is 55. During Days 18 to 20 of the Cycle, I would like the breast size to slightly increase to 60. If pregnancy button on the HUD is pressed, breast size will increase to 70. To set this up, this is what my folders would look like:

Explanation: Contents of "Cycle" subfolder will be auto-attached (added) when your avatar reaches Day 18 of your Cycle, and auto-detach when your avatar reaches Day 21. Contents of "Baseline" subfolder will be auto-attached (added) during other days of the Cycle other than Days 18, 19 and 20. Contents of "Pregnant" subfolder will be auto-attached when pregnant mode is on, and auto-detached when pregnant mode is off.
Gunshot wounds
-
Make a #Izzie’s folder within the #RLV folder in the root level of your inventory. If you don’t already have a #RLV folder, create one.
If you already have a #Izzie's folder, go to step 2.
-
Create a subfolder in the #Izzie’s folder and name it “Gunshot”.
-
Copy either the tattoo layers or the underwear layers from the Injuries add-on folder into "Gunshot". The layers must be organised in subfolders as indicated in the snapshot below.

Blood
Blood layers from Really Dangerous Explosives Pack
-
Make a #Izzie’s folder within the #RLV folder in the root level of your inventory. If you don’t already have a #RLV folder, create one.
If you already have a #Izzie's folder, go to step 2.
-
Create a subfolder in the #Izzie’s folder and name it “Blood”.
-
Copy one or more desired tattoo layers in the folder from your purchase of the Really Dangerous Explosives Pack into the "Blood" folder you created in Step 2. There are 5 tattoo layers corresponding to Face, Chest, Back, Legs, Pelvis, depending on where you want blood to appear on your avatar when injured. If you are using the LeLutka Evo X head, use "Izzie's - LeL Evo X - Face Blood Splatters" instead of "Izzie's - Face Blood Splatters". Your RLV folder might look something like the following structure when you are done:

Explanation: Contents of "Blood" subfolder will be auto-attached (added) when your avatar receives explosion Fragmentation damage to Health. (Injuries add-on v2.5 is required). Contents will be auto-detached if Health meter is restored to 100%.
Blood layers from "Face & Body Blood & Wounds" set from Izzie's
-
Make a #Izzie’s folder within the #RLV folder in the root level of your inventory. If you don’t already have a #RLV folder, create one.
If you already have a #Izzie's folder, go to step 2.
-
Create a subfolder in the #Izzie’s folder and name it “Blood”.
-
Browse through the different tattoo layers in your "Izzie's - Face and Body Blood & Wounds" folder in your inventory. (Bought separately).
-
Copy the desired tattoo layer into the "Blood" folder you created in Step 2.

Explanation: Contents of "Blood" subfolder will be auto-attached (added) when your avatar receives explosion fragmentation damage to Health. (Injuries add-on v2.5 is required). Contents will be auto-detached if Health meter is restored to 100%.
Bruises
Bruise layers from "Face & Body Bruises" set from Izzie's
-
Make a #Izzie’s folder within the #RLV folder in the root level of your inventory. If you don’t already have a #RLV folder, create one.
If you already have a #Izzie's folder, go to step 2.
-
Create a subfolder in the #Izzie’s folder and name it “Blood”. If you already have this subfolder, go to step 3.
-
Create another subfolder in the "Blood" subfolder and name it "Bruises".
-
Browse through the different tattoo layers in your "Izzie's - BOM Layers Face and Body Bruises" folder in your inventory. (Bought separately)
-
Create 5 subfolders in the "Bruises" folder you created in Step 3. Name them as Body01, Body02, Body03, Body04 and Body05. These 5 subfolders correspond to 5 levels of internal bleeding, with 01 being minor bruising to 05 being severe bruising. Copy the desired tattoo layers from your purchase into the subfolders. For example, this is what I chose for my avatar:

If you have dark skin tones, you may also try putting in more than 1 layer in the subfolder, as wearing multiple layers will raise the intensity.
Explanation: Contents of "Bruises" subfolders will be auto-attached (added) when your avatar receives explosion Shock damage to Health. (Injuries add-on v2.5 is required). Depending on the extent of damage, a different subfolder will be auto-selected by the HUD, with Body01 being the lowest and Body05 being the highest damage. Contents will be auto-detached if Health meter is restored to 100%.
Flushed Skin Pack - Alcohol Flush, Blush , Exercise Flush, Sex Flush
-
Make a #Izzie’s folder within the #RLV folder in the root level of your inventory. If you don’t already have a #RLV folder, create one.
If you already have a #Izzie's folder, go to step 2.
-
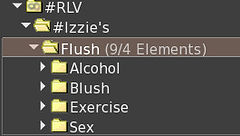
Create a subfolder in the #Izzie’s folder and name it “Flush”.
- Copy the contents of 4 sub-folders from the "Flush" folder in your Marketplace delivery folder for Flushed Skin Pack into the "Flush" folder you just created. The folder structure should look like this:
- The full set of layers copied over to the Flush folder in your #RLV directory would look like the following. Now delete the layers that are not required. You should still have the original copy in your MP delivery folder.

For example, for Alcohol Flush,
1. There is one layer for 'Face & Neck' and one layer for 'Ears'. You can choose to have either or both depending on where your avatar would turn red when drunk.
2. There are 3 levels of redness you can choose from - 70%, normal, and stronger.
3. If your avatar has a Lelutka Evo X head, choose from the layers with "LeL Evo X" in the name.
Delete the layers that are not required from the folder.
Explanation: Contents of "Alcohol", "Blush", "Exercise" and "Sex" subfolders will be auto-attached (added) when your avatar triggers it. Please see the Skin Effects page for the triggering conditions.
Farming - Really Dirty Hands & Legs
Instructions if you bought this through in-world store vendor
-
Make a #NeedyHUD folder within the #RLV folder in the root level of your inventory. If you don’t already have a #RLV folder, create one.
If you already have a #NeedyHUD folder, go to step 2.
-
Create a subfolder in the #NeedyHUD folder and name it “Agriculture”. If you already have a Agriculture folder, go to step 3.
-
Create a subfolder in the Agriculture folder and name it “Dirt”.
-
Under the Dirt, create another 2 more sub-folders and name them "Hands" and "Legs" respectively.
-
In the "Hands" sub-folder, create 3 sub-folders named "1", "2" and "3".
-
In the "Legs" sub-folder, create 3 sub-folders named "1", "2" and "3".
- Copy the relevant layers from your delivery folder for Really Dirty Hands & Legs into the various sub-folders you just created. Refer to the snapshot on the right for a sample configuration.
Instructions if you bought this through Marketplace
-
Make a #NeedyHUD folder within the #RLV folder in the root level of your inventory. If you don’t already have a #RLV folder, create one.
If you already have a #NeedyHUD folder, go to step 2.
-
Copy and paste the folders (including contents) from the MP delivery folder into your #NeedyHUD folder.
-
Check that the folder structure looks like the snapshot on the right above.

Explanation:
-
Contents of the numbered subfolders will be auto-attached (added) when your avatar triggers it by planting seeds, starting with 1.
-
As your avatar plants more seeds, it will move from 1 to 2 and lastly to 3 to represent increasing dirtiness of hands and legs.
-
The BOM layers numbered "Level 1" are the lowest intensity of garden dirt, while the layers numbered "Level 3" are the highest intensity of garden dirt.
-
You can configure how dirty your avatar gets by copying the chosen layer into the folders, and whether both the shins & knees, or only knees etc.
-
By showering and restoring your avatar's Hygiene to 100%, the layers will be automatically removed. (You can also manually detach any layer).
Frequently asked questions
Q1. Can you list out all the subfolders in the #Izzie's folder, if I have everything?
A1. Yes, here you go:

Q2. You mentioned "BOM" several times on this page. What is BOM?
A2. BOM or Bakes On Mesh is a feature that has been introduced in 2019 by Linden Labs.
It allows system layers to show on mesh body parts. Read much more about it here.
Flushed Skin Pack - Alcohol Flush, Blush , Exercise Flush, Sex Flush
-
Make a #Izzie’s folder within the #RLV folder in the root level of your inventory. If you don’t already have a #RLV folder, create one.
If you already have a #Izzie's folder, go to step 2.
-
Create a subfolder in the #Izzie’s folder and name it “Flush”.
- Copy the contents of 4 sub-folders from the "Flush" folder in your Marketplace delivery folder for Flushed Skin Pack into the "Flush" folder you just created. The folder structure should look like this:
- The full set of layers copied over to the Flush folder in your #RLV directory would look like the following. Now delete the layers that are not required. You should still have the original copy in your MP delivery folder.
Q3. Are there any known issues?
A3. These are 2 known issues outside of my control. If these occur when you try the demo with your Really Needy HUD, do not buy unless
you do not mind them.
1. Avatar turns grey (rebake) for a split second when layer is being applied. No fix known.
2. In some occasions when multiple BOM layers are being worn (by RLV), layer added is not visible.
There is also currently no way a script is able to change the order of BOM layers on an avatar.
Fix: right-click on avatar, choose Edit Outfit and exit. The layer should become visible.
TIP: Do you know that you can also disable your avatar going into the automatic pose when you select Edit Outfit?
Go to Preferences > Move & View > Uncheck the box for "Appearance" under "Automatically pose avatar during".
Ideas, suggestions and feedback
Please leave your comments on this page.